When you give a presentation, you want to impress your audience by making them consider you competent, whether to win the next big project, contract, or inform. A well-design presentation can have an impact on your presentations.
One way to do this is to make your presentation stand out by making it interactive. An interactive presentation is an effective technique to provide information while keeping your audience’s attention.
What is an interactive presentation?
Before we go any further, we must define the term ‘Interactive Presentation’. ‘Interactive’ describes presentations that include quiz sections or audience engagement. However, it’s not the same as what we are talking about here.
But, the term ‘interactive’ here refers to a clickable presentation with hyperlinks to help users move to different sections. A hyperlink presentation allows users to select and order the information they want to view.
On the other hand, an interactive presentation works effectively when your audience needs to interact directly with what’s on the screen and give them control over how they digest information.
This article will show you how to make an interactive presentation in Google Slides. So keep an eye on things!
How to create an interactive presentation
1. Start with a blank document from the Google Slides homepage. This is your blank slate for making an outstanding interactive presentation!
When you start a new presentation on Google Slides, it automatically inserts a title slide; you only have to click on the title text box and write a title. When making the title, make it straightforward and appealing so that your audience can quickly grasp it.

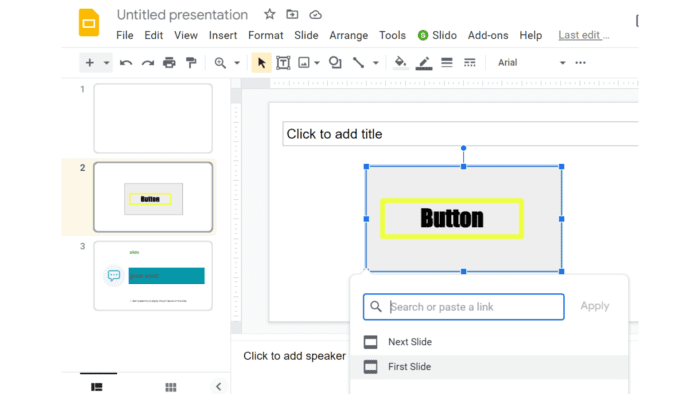
2. Let’s jump to the main menu slide. We’ll make something that resembles a button so your audience understands it’s clickable. Then, we’ll include hyperlinks. You can use any shape for your button in this section.
First, locate the shape button on the toolbar and choose a shape in the slides. Second, double-click on the slide to bring up that shape. Lastly, to adjust the size of the form, use the nodes along its edges to click and drag.
Furthermore, you can add labels by typing on the shape or clicking the text box button and putting a text box on top of the shape to help the button be clickable.

3. To add a drop shadow, just right-click it > select Format Options > check the Drop Shadow box.
In addition, you can make your buttons a contrasting color from the background and other text. However, if you don’t want your interaction to be distracting, you can avoid the colors that are too bright.

4. Return to the previous menu slides. Make it clear shapes to cover the ‘Button’ you’ve made. These transparent shapes will be converted into hyperlinks allowing people to move across your presentation.
First, click on the shape button in the toolbar and then draw a shape that covers the newly created controller. Then, choose the shape and click the Fill color option on the toolbar > choose transparent from the dropdown menu.

5. Now we’re ready to link the button!

Nowadays, interactive presentations are popular in both formal and informal events. Whether for a meeting, seminar, or other events, you can create your interactive simply and quickly using Google Slides. Good luck!


