As a result of the pandemic a few months ago, it brings up so many impacts on human life. For example, all of the school’s activities are carried out digitally. And you’re as a teacher, what did you do when you wanted to teach your students in an effective and fun way in learning?
Some of you might try to make any subject material by video so your students can watch it at home. To make this happen, you must know how to edit a video. However, it takes a lot of time.
What if you try to find an alternative way to make a video without much effort? And the answer is, of course, you absolutely can make this one. You can make simple video learning for your students in an easier way through PowerPoint.
This article will show you how to convert presentation slides to videos using PowerPoint for Microsoft 365. After you create a presentation, you can convert the slides into attention-grabbing videos. These steps below will explain to you in detail.
The result of the previous file consists of animation, narration, and other custom content and forms as the original .ppt or .pptx file. Then, you can convert the last file into a video. So, check out these tips below!
1. Launch Ms. PowerPoint and open the presentation file you want to convert into a video. If your presentation file is finally open, make sure that the latest version of your presentation file is saved by selecting File>Save or Save on the Quick Access Toolbar.

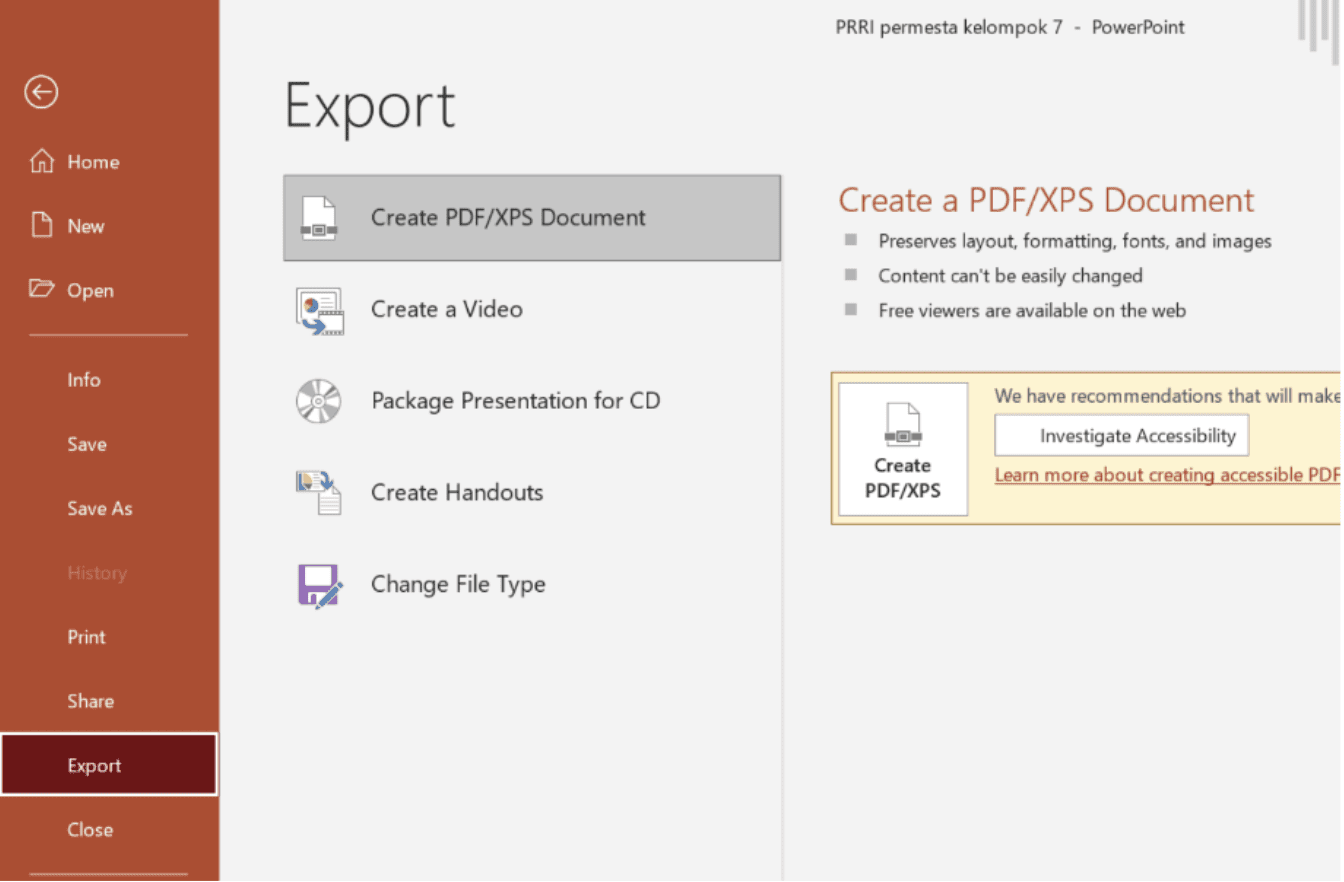
2. Select ‘File’ and the ‘Export’ option.
Note: if you use PowerPoint 2010, you need to choose ‘Save & Send’ to replace the ‘Export’ option.

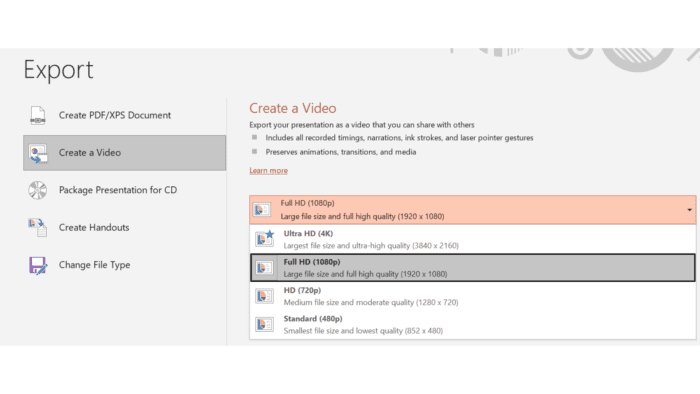
3. Then, select the ‘Create a Video’ option. In this section, choose the video quality that you prefer to use for the video slideshow. Remember! A high-quality screen resolution result might be completed in a larger size. Meanwhile, a low-quality screen resolution result can be achieved in a smaller file size.

4. In this section, ensure recorded timings and narrations in the video. If you want your video contains timings or narrations, you can go for the ‘Record Timings and Narration’ option. Next, to decide the times of each slide’s video, you can set up the time in the ‘Second spent on each slide’ text box. Thus, these narrations can include a thumbnail image and be recorded on your webcam.

5. After that, you can continue to choose the resolution of your video. Then, select ‘Create Video’.

6. A ‘Save As’ bar menu will appear. In this section, you can choose a location to save the file, re-name a filename, and choose the type of format (MPEG-4 Video / MP4 or Windows Media Video / MWV) by selecting the ‘Save as type’ in the drop-down arrow.

Then, select ‘Save’ to start the video-creating process. The progress may take a few minutes or more, depending on the video’s size and complexity.
To summarize, PowerPoint is a great tool for presenting or showcasing a message, data visualization, or product. To make the viewers or audiences get attracted to your presentation, you can try this way which is converting your presentation slides into video. Hopefully, you can find it easier to follow the tips above!


